Ever found yourself itching to access a crucial website, only to discover it’s blocked on your school Chromebook? Wondering if there’s a way around it without diving into the complexities of a VPN? You’re not alone! Dive into this guide to unravel the secrets of How to Unblock Websites on School Chromebook without VPN. Whether it’s for research, catching up on some reading, or simply quenching your curiosity, we’ve got you covered with top-notch methods.
Method 1: Using Web-based Proxies
Web-based proxies function as digital go-betweens, bridging the gap between your Chromebook and the websites you intend to visit. They provide a cloak, fetching blocked content and presenting it via their own platform, making your access indirect. Here’s your roadmap to unlocking websites using this approach:
- Begin by searching for trusted web-based proxy services using a search engine.
- From the displayed results, pick a dependable web-based proxy.
- Launch the chosen web-based proxy service in your Chromebook browser.
- On the proxy’s interface, you’ll spot a search or URL bar. Input the address of the website you’re trying to access there.
- The proxy works its magic by retrieving the content from the requested site and presenting it via its own platform. In doing so, it skirts around any school-inflicted web barricades.
- With the initial blockage out of the way, you can explore the website’s content unhindered via the proxy’s platform.
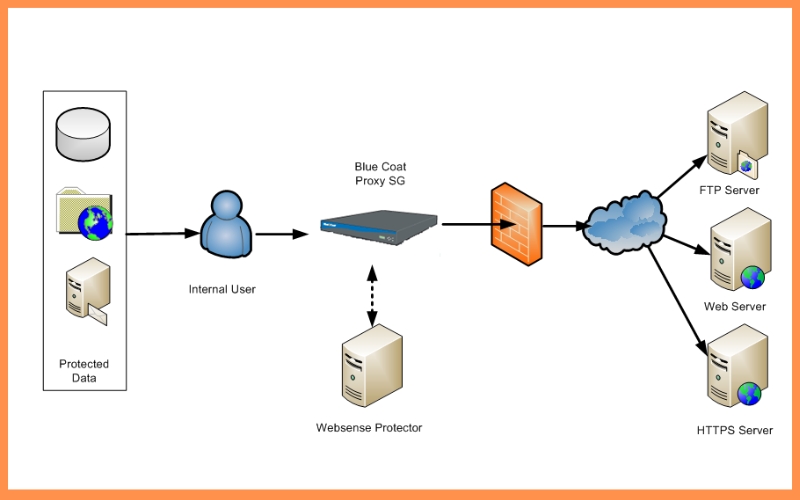
As convenient as web-based proxies might seem, they come with caveats. Their performance can sometimes lag in speed, and their availability may be sporadic. Plus, educational institutions might be onto them, often blacklisting known proxy services. So, it’s astute to have a roster of proxies at hand, switching between them if one gets flagged or becomes non-functional.
Moreover, web proxies are not fortresses of security. Ensure you tread lightly – refrain from entering personal data, logging into personal accounts, or performing actions that could jeopardize your online safety. Stick to reputable proxy services and always prioritize your digital well-being.
Method 2: Using Chrome Extensions
In the realm of technological solutions, Chrome extensions serve as powerful tools, especially when seeking ways to access restricted content. On devices such as your school Chromebook, these extensions can be instrumental. They function by modifying your browser’s behavior, enabling it to navigate around filters and reach blocked content. Here’s a step-by-step guide on harnessing Chrome extensions for this purpose:
- Start by accessing the Chrome Web Store on your Chromebook. Simply click on the Apps Launcher and choose “Web Store” from the dropdown menu of apps.
- In the store’s search bar, key in terms like “website unblocker” or “proxy extension”. This will display a range of extensions geared towards your purpose.
- Before installing, it’s pivotal to scrutinize the available extensions. Dive into their descriptions, peruse user feedback, and consider the ratings. This ensures you select not just an effective, but also a trustworthy extension.
- Found the perfect fit? Click on “Add to Chrome” for installation.
- Post-installation, some extensions might require a bit of tweaking in the settings. This is to tailor your browsing experience to your preferences.
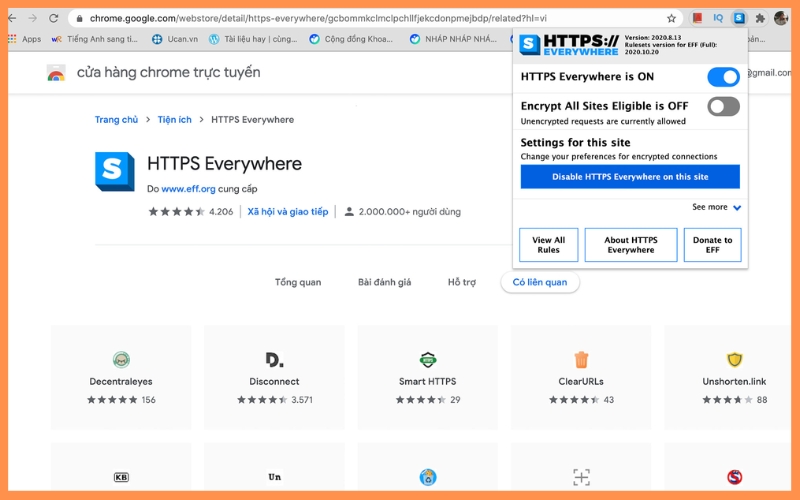
With the extension activated, navigate to the website you were previously unable to access. The extension operates discreetly in the backdrop, circumventing filters and allowing you seamless access.
While Chrome extensions are undeniably handy, potential risks lie in data collection and privacy breaches. Always prioritize safety by opting for well-regarded extensions sourced from verified developers.
Method 3: Modifying Chromebook DNS Settings
The DNS (Domain Name System) serves as the digital “telephone directory” of the internet, converting human-readable domain names into IP addresses. By adjusting these settings on your school Chromebook, you can potentially sidestep the school’s DNS restrictions and gain access to otherwise blocked websites. Follow these steps to navigate through the process:
- On your Chromebook’s screen, locate the network icon in the bottom-right corner and click on it.
- From the ensuing menu, choose “Network Settings”. Then, in the “Network” section, select either “Wi-Fi” or “Ethernet,” contingent on your connection type.
- Spot your Wi-Fi network or Ethernet connection and proceed to click on its name.
- Within the connection details window, navigate to the “Network” tab. Here, under the “Name Servers” category, choose the “Custom name servers” option.
- Furnish the IP address of a public DNS server recognized for its unrestricted and swift access. Noteworthy options include Google’s DNS (8.8.8.8, 8.8.4.4) or Cloudflare’s DNS (1.1.1.1, 1.0.0.1).
- Save your modifications and exit the settings pane.
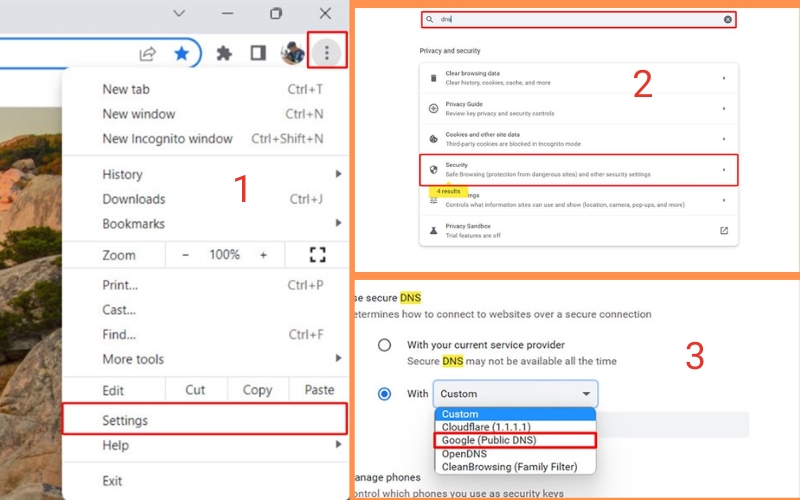
By adopting a different DNS server via these modifications, your online traffic reroutes, evading school-imposed online barriers. This empowers you to browse previously inaccessible sites, all without leaning on third-party tools.
While ingenious, this technique isn’t infallible. Some educational institutions employ sophisticated filtering systems that can discern and thwart such DNS alterations. Therefore, while useful, this tactic might not guarantee success across the board.
Lastly, it’s prudent to restore the DNS settings to their default values post your browsing endeavor. This ensures smooth internet access in other environments and scenarios.
Method 4: Accessing Websites through Google Translate
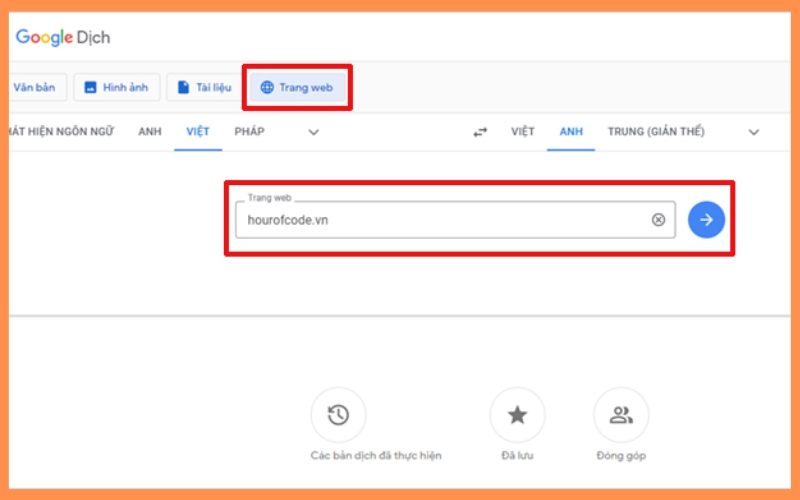
Google Translate, known primarily for its translation capabilities, can also double up as a crafty tool to navigate around website blocks on a school Chromebook. The concept? Leverage Google Translate to act as a proxy, fetching the content of the site you wish to explore. Here’s your blueprint for this inventive approach:
- Start by navigating to the Google Translate website using your Chromebook’s browser.
- In the text box on the left, key in the website address you’re eager to access.
- On the right-hand side, pick a language different from the site’s native one. This action prompts Google Translate to get to work, fetching a translated rendition of the site.
- Upon clicking the translated text box, you’ll see the webpage albeit in its translated avatar.
- Within this translated view, clicking on links or various page elements lets you delve deeper into the site.
- With Google Translate in the mix, it fetches and showcases content from sites otherwise barred by school restrictions.
However, this method comes with certain constraints. Sites laden with intricate designs or those that lean heavily on JavaScript might not translate or function seamlessly. Moreover, remember you’re working with a translation tool – so the browsing speed might be a tad sluggish, and the experience slightly off due to translation nuances.
This method is resourceful but doesn’t equate to a secure gateway. It’s paramount to sidestep actions that could risk your digital privacy. Refrain from inputting personal data or logging into accounts when navigating sites via Google Translate. And, as always, be considerate of your school’s digital regulations and stay within the bounds of acceptable use.
Google Translate isn’t just a bridge between languages but can also serve as a bridge to a more expansive web on your school Chromebook. Deploy this tactic smartly, and you can usher in a world of information, both for academics and for personal exploration.
Method 5: Using Tor Browser
The Tor Browser stands as a beacon for those seeking both anonymity and a way around online restrictions. Operating via a layered relay network, it encrypts and channels your internet activities, rendering them untraceable. If you’re considering using the Tor Browser on your school Chromebook, here’s your step-by-step guide:
- Download the Tor Browser only from its official source, the Tor Project website, and then install it on your Chromebook.
- Post-installation, fire up the Tor Browser.
- The browser will initiate a connection to the Tor network, setting the stage for a secure browsing session.
- With the Tor Browser open, directly input the website address you’re keen on accessing.
- The genius of the Tor Browser is that it sends your data through multiple relays, obscuring its origin and evading restrictions that your school might have in place.
- With barriers bypassed, feel free to explore the once-blocked website and harness its content.
- Despite its prowess, the Tor Browser does have its nuances. Due to the extensive routing and encryption, you might experience a tad slower browsing pace.
The Tor Browser is mighty but must be wielded wisely. Familiarize yourself with your school’s digital guidelines, as some institutions might be on the lookout for Tor’s distinct traffic patterns or may have policies discouraging its use. It’s imperative to be cognizant of potential ramifications and to prioritize your online well-being.
In essence, the Tor Browser is an invaluable ally for circumventing online roadblocks and safeguarding your digital anonymity on a school Chromebook. Embrace it judiciously to access both academic resources and personal explorations
Method 6: Accessing Websites via RSS Feed Readers
RSS feed readers, often overlooked, can be your stealthy sidekick to access content from blocked websites on a school Chromebook. They work by subscribing to a website’s RSS feed, enabling you to view its content without accessing the site directly. Here’s a clear-cut guide to get you started with RSS feed readers:
- Start by seeking out a compatible RSS feed reader for your Chromebook. Trusted platforms like Feedly and Inoreader come highly recommended.
- Create an account on your chosen RSS feed reader platform.
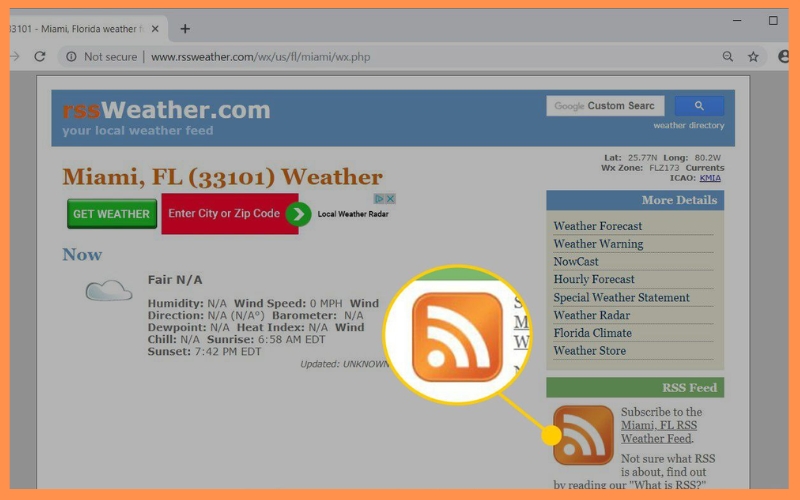
- Navigate to the blocked site you’re curious about and search for its RSS feed, typically denoted by the recognizable orange RSS emblem.
- Copy the RSS feed’s URL for later use.
- With your RSS feed reader open, locate the option to add or subscribe to a new feed.
- Paste the copied RSS feed URL into the designated space and confirm your subscription.
- Your chosen RSS feed reader will now pull in the latest articles or updates from the blocked site, neatly presenting them within its interface.
However, this approach does come with its quirks. Not every website supports RSS feeds or provides comprehensive content via this channel. Consequently, the experience might feel a bit trimmed down compared to direct site access. Yet, for regular articles, blog entries, news, and other RSS-friendly content, this method shines.
While RSS is handy, always be respectful of individual website terms. Some sites might have specific conditions concerning RSS feed access, or might even have copyright restrictions in place. It’s vital to ensure you’re not stepping on any toes or overstepping boundaries.
In summary, RSS feed readers serve as a discreet doorway to otherwise blocked content on a school Chromebook. Delve into this technique and keep abreast of vital information for both academic and personal pursuits.
Conclusion
In wrapping up, navigating the digital landscape of a school Chromebook doesn’t have to be limiting. As we’ve outlined, there are several ingenious methods on how to unblock websites on school Chromebook without VPN, ensuring you get the information and content you need. Keep these techniques in your back pocket and browse freely, responsibly, and smartly. For more insights, tips, and tech-savvy solutions, don’t forget to explore more blogs from Twistory. We’re always here to illuminate the digital path for you!

