Have you ever been blocked by a website while using cURL? A powerful strategy to bypass this is by directing your requests via a proxy server, which makes it harder for your traffic to be recognized as automated.
In this guide, we’ll walk you through the process of utilizing a cURL with Proxy, along with the optimal practices and protocols to keep in mind when web scraping.
Let’s dive in!
What Is a Proxy in cURL?
In cURL, a proxy serves as a go-between that connects you (the client) to the server you’re trying to access. Essentially, it plays the role of an intermediary, managing your requests and responses, rather than you connecting directly to the desired server.
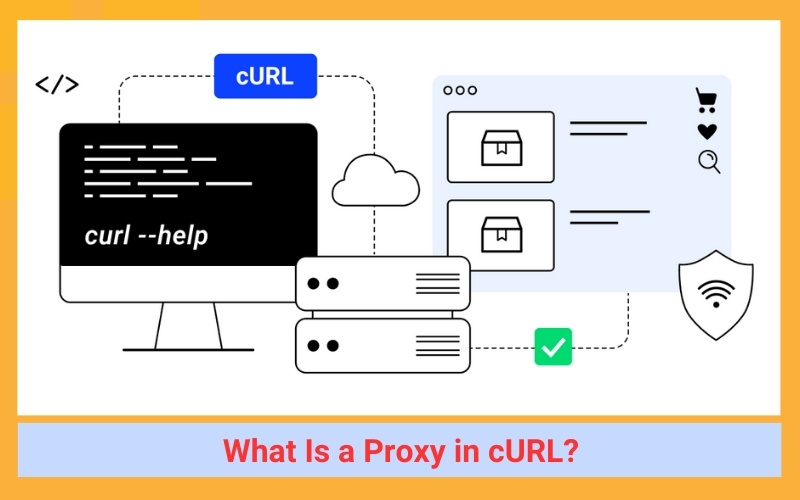
Here’s a breakdown of how it works:
- You dispatch a request to the proxy server: This request could be for any resource, such as a website, an API, or a file.
- The proxy server relays your request to the target server: It represents you, transmitting your request with its own IP address and details.
- The target server replies to the proxy server: The reply includes the requested resource or data.
- The proxy server sends the response back to you: You get the response from the target server as though you had connected directly to it.
How to Use a Proxy with cURL: A Step-by-Step Guide
Let’s explore how you can utilize a cURL with Proxy server to transmit and retrieve data over the internet.

cURL Syntax
Before we dive in, it’s crucial to highlight the key components of cURL’s syntax:
- PROTOCOL: The internet protocol used by the proxy server, like HTTP or HTTPS.
- HOST: The hostname, IP address, or URL of the proxy server.
- PORT: The designated port number for the proxy server.
- URL: The URL of the target website that the proxy server will interact with.
curl --proxy <PROTOCOL>://<HOST>:<PORT> <URL>
Setting Up a cURL with Proxy
Here’s how you can configure a cURL with Proxy:
Begin by substituting [PROTOCOL://]HOST[:PORT] with the address and port number of your proxy server, and replace the target URL with https://httpbin.org/ip (a test page). There are numerous free proxies available.
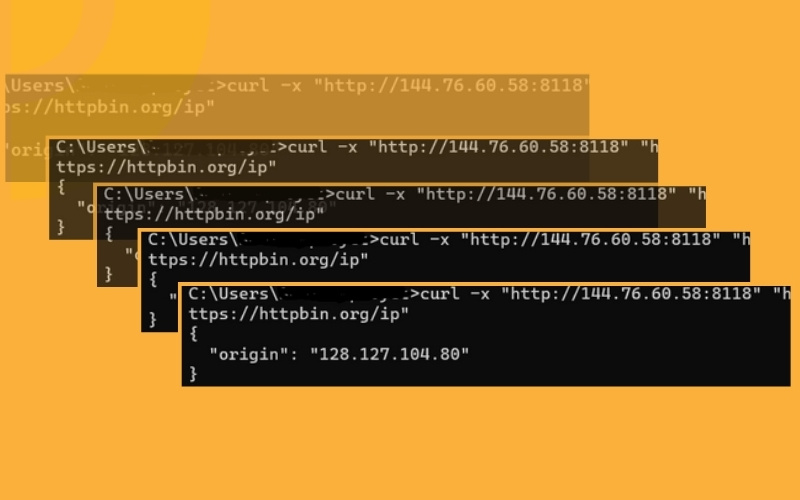
Then, open a Terminal or Command Prompt on your computer, and execute the following command to initiate a request via a proxy:
curl --proxy "http://144.76.60.58:8118" "https://httpbin.org/ip"
The response you receive should be a JSON payload that includes the IP address of the proxy server.
Data Extraction Techniques with cURL and Proxy
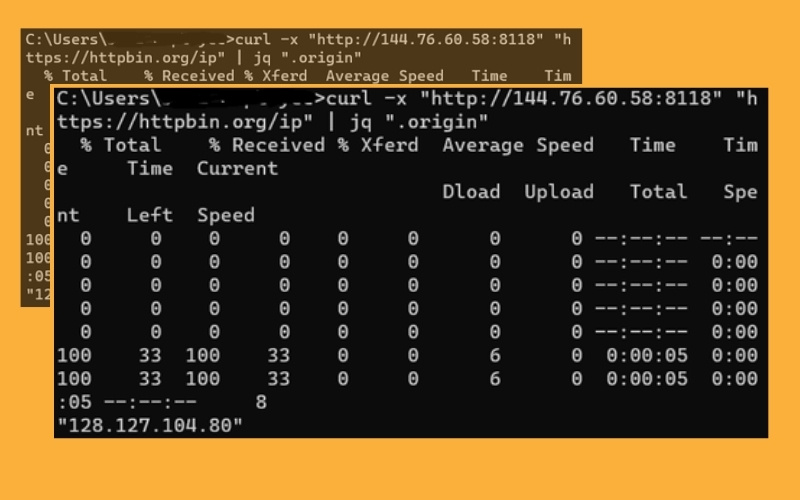
Reflect on the previous cURL proxy example that returned a JSON object with an “origin” field. To extract the value of this field, you can us ‘jq in conjunction with the preceding command.
curl -x "http://144.76.60.58:8118" "https://httpbin.org/ip" | jq ".origin"
The output represents the actual value of the ‘origin’ field, which, in this instance, is the IP address returned in the response.
Proxy Authentication in cURL: Usernames and Passwords
Certain proxy servers implement security protocols to prevent unauthorized access, necessitating a username and password for proxy access.
cURL accommodates proxy authentication, enabling web scrapers to interact with these proxy servers while adhering to their security protocols.
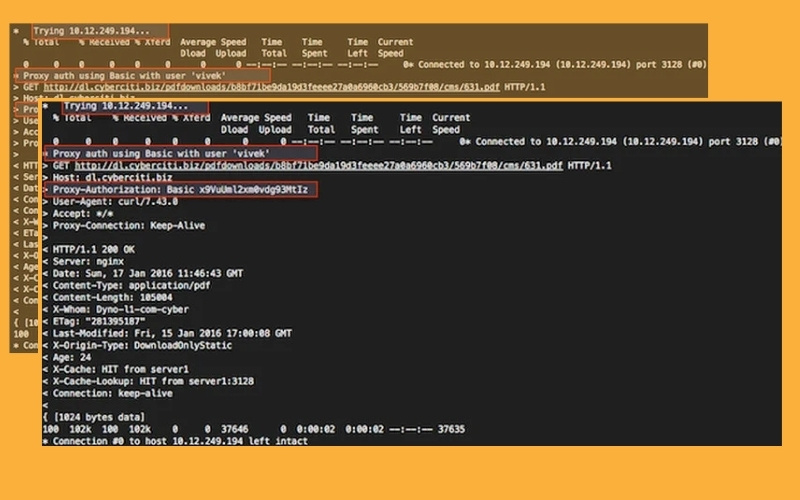
Here’s how to establish a connection to a URL using an authenticated proxy with cURL:
Initially, you’ll need to supply the username and password for the proxy server using the --proxy-user option.
For instance, if you wish to connect to a proxy server at http://proxy-url.com:8080 that mandates authentication with the username ‘user’ and the password ‘pass’, the CLI command to execute this operation would be as follows:
curl --proxy http://proxy-url.com:8080 --proxy-user user:pass http://target-url.com/api
This command employs the provided username and password for authentication to transmit the HTTP request to the target URL via the specified proxy.
Additionally, you’ll need to incorporate a proxy-authorization header in your request header. The –proxy-header option in cURL facilitates this, as demonstrated below:
curl --proxy http://proxy-url.com:8080 --proxy-user user:pass --proxy-header "Proxy-Authorization: Basic dXNlcjEyMzpwYXNzMTIz" http://target-url.com/api
Best Practices for Using cURL with a Proxy
Next, let’s delve into the best practices for using a cURL proxy.

Setting Environment Variables for cURL Proxy
Environment variables play a crucial role when using a cURL proxy, as they enable you to define proxy server URLs, usernames, and passwords as variables. These can be accessed by cURL commands, eliminating the need to manually input these values each time. This not only saves time and effort but also simplifies the management of multiple proxies for various tasks.
To utilize cURL proxy environment variables, follow these steps:
Initially, in your Terminal, establish the proxy server URL, username, and password as environment variables using the ‘export’ command. Substitute ‘username’ and ‘password’ with the relevant values for your proxy server. If authentication isn’t required, you can exclude the username and password from the URL.
export http_proxy=http://<username>:<password>@proxy-url.com:8080
export https_proxy=https://<username>:<password>@proxy-url.com:8080
Note: If you’re operating on a Windows OS, execute this alternative command:
set http_proxy=http://<username>:<password>@proxy-url.com:8080
set https_proxy=https://<username>:<password>@proxy-url.com:8080
Subsequently, reference the environment variables in your cURL commands using the ‘$’ symbol.
curl -x $http_proxy https://httpbin.org/ip
Creating Aliases for Efficient cURL Usage
Aliases are crucial in cURL as they aid in simplifying and streamlining the execution of repeated or complex cURL requests. By establishing an alias, you can create a shortcut for a specific cURL command with certain options and parameters. This makes it easier to rerun the command in the future without having to recall or retype all the details, saving time and minimizing the risk of errors.
Furthermore, aliases can enhance the readability and comprehensibility of cURL commands, particularly for users who may be less acquainted with the syntax or available options. To create an alias, you can utilize the alias command in your terminal. For instance, you can create an alias for ls -l as ll by executing the command alias ll=ls -l.
Here’s how to automatically use the proxy server and credentials specified in your environment variable, sparing you the hassle of typing out the full command each time:
Begin by opening your shell’s configuration file, such as .bashrc or .zshrc, using a text editor. This file is typically located in the home/<username>/ folder on Mac and c/Users/<username> folder on Windows. If it doesn’t exist, you can create the file in this folder.
The next step is to add the following snippet to the file to create an alias. In this case, curlproxy is the name of the alias, and $http_proxy used in the snippet below is the environment variable we created in the previous section. You can also customize the alias name to suit your preference.
alias curlproxy='curl --proxy $http_proxy'
Now, you can use the “curlproxy” alias followed by the URL you want to connect to via the proxy. For example, to connect to “https://httpbin.org/ip” via the proxy, you can run the following command:
curlproxy https://httpbin.org/ip
Use a .curlrc File for a More Efficient Proxy Setup
The .curlrc file is a text file that contains one or more command-line options passed to cURL when you execute a command. You can store your cURL settings, including proxy configuration, making it easier to manage your commands.
To use a .curlrc file for cURL with a proxy, do the following:
Create a new file named .curlrc in your home directory. Add the following lines to the file to set your proxy server URL, username, and password, then save it:
proxy = http://user:[email protected]:8080
If a username and password are required, add them as shown below:
proxy = http://user:[email protected]:8080
Execute the default cURL command to connect to https://httpbin.org/ip via the proxy you have configured in the .curlrc file:
curl https://httpbin.org/ip
Implementing Rotating Proxies with cURL
Rotating proxies play a crucial role in web scraping as they aid in circumventing IP blocking and website restrictions by altering the IP address utilized for each request.
Let’s delve into how to implement this with a cURL proxy, starting with a free solution and then moving on to a premium one. We’ll also understand why the latter is essential.

IP Rotation with Free Solutions
In this example, we’ll utilize a free provider to establish a rotating proxy with cURL.
To start, visit a Free Proxy List to obtain a list of free proxy IP addresses. Take note of the IP address, port, and authentication credentials (if any) for the rotating proxy you wish to use.
Next, replace ‘username’, ‘password’, ‘ipaddress’, and ‘port’ with the values from your rotating proxy list and save them in the .curlrc file you previously created:
proxy = http://<username>:<password>@<ipaddress>:<port>
proxy = http://<username>:<password>@<ipaddress>:<port>
proxy = http://<username>:<password>@<ipaddress>:<port>
Finally, to test if the rotating proxy is functioning, open a Command Prompt and execute the following command:
curl -v https://www.httpbin.org/ip
The output should display one of the IP addresses you saved in the .curlrc file.
{"origin": "162.240.76.92"}
Best Proxy and Protocol Practices for cURL
The selection of a cURL proxy protocol and proxy type can greatly influence the performance and reliability of your network communication.
Let’s explore the most effective choices!

Top Types of Proxies for cURL
Here are some commonly used proxies for cURL web scraping:
- Residential: These proxies utilize IP addresses linked to actual residential locations. This makes them less susceptible to detection and blocking by anti-bot systems.
- Datacenter: This type of proxy server isn’t associated with an Internet Service Provider (ISP). They’re extensively used in web scraping due to their speed, affordability, and the anonymity they provide.
- 4G Proxy: A mobile proxy server that directs internet traffic via a 4G LTE connection. While they’re typically pricier than data center proxies, they offer superior anonymity and enhanced reliability.
Understanding Protocols in the Context of cURL and Proxy
Let’s take a look at the most commonly used protocols that cURL supports:
- HTTP: Hypertext Transfer Protocol, the backbone of data communication on the web.
- HTTPS: HTTP enhanced with an additional layer of security through encryption (SSL/TLS).
- FTP: File Transfer Protocol, utilized for transferring files between servers and clients over the internet.
- FTPS: FTP fortified with an extra layer of security through encryption (SSL/TLS).
- LDAP: Lightweight Directory Access Protocol, an open, vendor-neutral, industry-standard application protocol for accessing and maintaining distributed directory information services over an Internet Protocol (IP) network.
- LDAPS: LDAP augmented with an added layer of security through encryption (SSL/TLS).
- HTTP, HTTPS, and SOCKS are the most pertinent protocols used in web scraping to facilitate communication between a client and a server.
Conclusion
Leveraging a cURL proxy can significantly boost your web scraping potential. It enables you to circumvent IP blocks and gain access to geographically restricted content. However, it’s essential to remember the best practices, such as rotating proxies and setting up environment variables.
In conclusion, mastering how to use cURL with a Proxy can open up a world of possibilities for your web scraping projects. And, don’t forget to follow Twistory.net for more interesting and useful information.


