
Are you trying to enhance your business network security, but not sure where to start? If you’ve found yourself asking these questions, then you’re in the right place.
This comprehensive guide on how to set up a proxy server will walk you through the steps, ensuring that you can browse the internet securely and privately. Trust us, setting up a proxy server is easier than you think—and you can’t afford to miss out on this level of control and security.
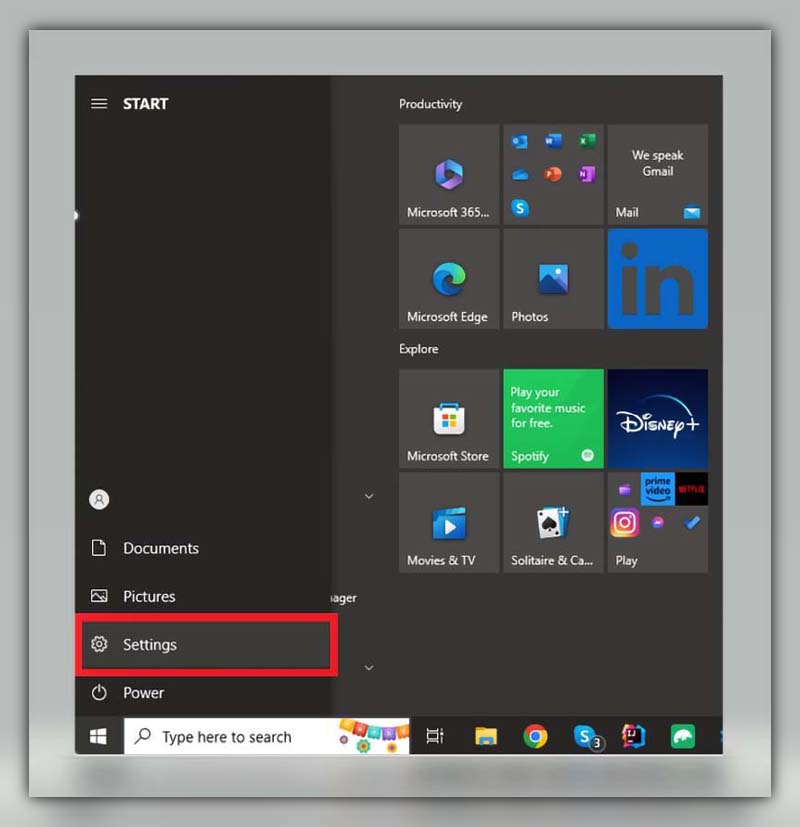
How to Find Proxy Settings in Windows?
Before setting up a proxy server, it’s important to check the proxy settings on your computer. These settings will guide you in configuring the appropriate type of proxy server. Here’s how to locate proxy settings on Windows:
- Click on the “Start” button and then select “Settings” (the gear icon) from the Start menu.
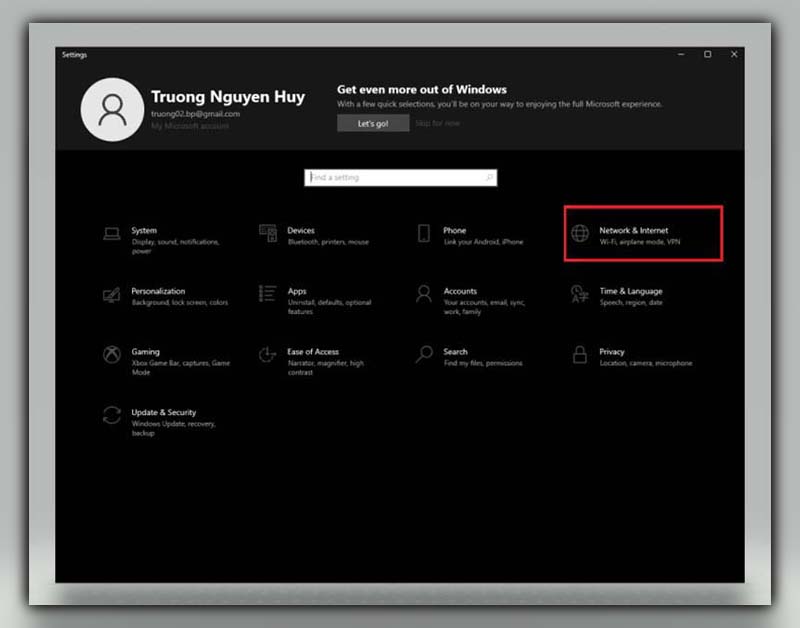
- Choose “Network & Internet.”
- Click on “Proxy” in the left panel.
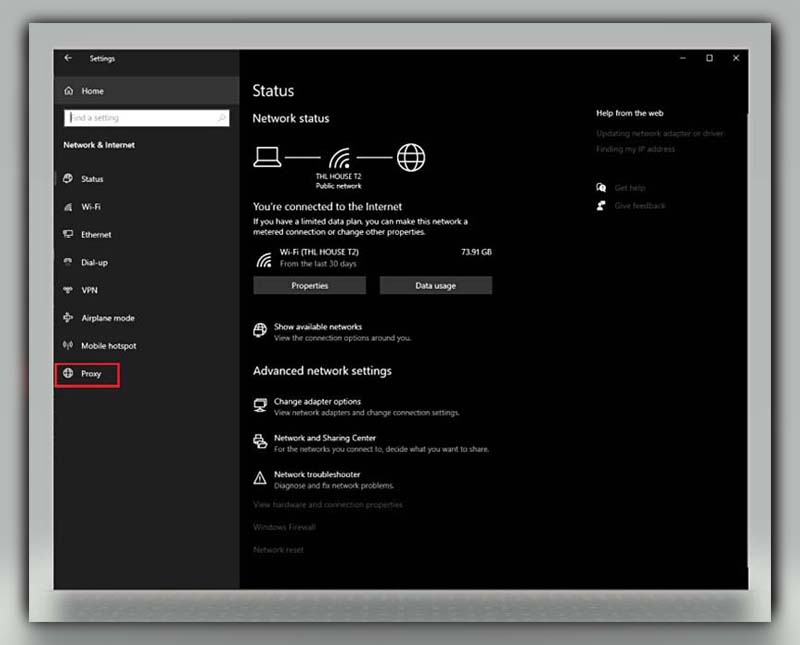
Here, you will find the necessary information regarding automatic proxy settings and manual proxy settings, which will be useful when configuring your proxy server.
How To Set Up A Proxy Server In Windows
Here’s how to configure a proxy server on your Windows 8 or Windows 10 PC:
- Simultaneously press the Windows key and the letter “I” (Windows + I) to open the Windows Settings menu.
- On Windows 10, click on “Settings,” then go to “Network & Internet” and select “Proxy.”
- On Windows 8, click on “Settings” and then choose “Network Proxy.”
- In the “Manual Setup” section, turn on the “Use a Proxy Server” toggle switch. Ensure that the “Automatically detect settings” toggle switch is also enabled.
- Windows typically checks if your business, school, or local network already has an automatic proxy server configured for you. If it finds one, it will display its name and guide you through the setup process.
- Assuming Windows detects a Proxy Auto-Configuration (PAC) file, in the “Automatic Proxy Setup” section, turn on the “Use Setup Script” switch.
- Enter the script address and click “Save.”
Congratulations! You’ve successfully configured your proxy server, and you’re now ready to use it.
How To Configure a Proxy In Windows 8 Or Windows 10
If your organization doesn’t automatically set up proxy configurations, you can manually set up a proxy server on Windows 8 or Windows 10. Here are the steps:
- Press the Windows key and the letter “I” simultaneously to access the Windows Settings menu.
- On Windows 10, click on “Settings,” then go to “Network & Internet,” and select “Proxy.” For Windows 8 systems, click on “Settings” and then choose “Network Proxy.”
- Scroll down to the section labeled “Manual proxy setup” and toggle the “Use a Proxy Server” switch to On.
- In the address field, type the proxy server name or IP address. In the Port field, enter the proxy port number. You can obtain these details from your IT support technician.
- If the proxy server requires a password, check the “Proxy server requires password” checkbox. Then, enter your account name and password in the Username and Password fields.
- Click “Save.”
That’s all you need to do. You’ve successfully configured your proxy server settings on Windows. The next time you use the internet, it will route through the proxy server you’ve set up.
How To Set Up A Proxy Server On A Mac Running MacOS
While this is tailored to Catalina, the steps are largely analogous across different macOS versions.
- Open System Preferences by clicking on the Apple menu in the top left corner of your screen, and then select “System Preferences.”
- In System Preferences, find and click on the “Network” icon to manage your network settings.
- Identify the type of network you’re using, which is usually either Ethernet (wired) or Wi-Fi (wireless).
- Click on “Advanced,” and then go to the “Proxies” tab.
- To automatically set up your proxy server settings:
a. Choose “Auto Proxy Discovery.”
b. Click on “Secure Web Proxy (HTTPS).”
c. Enter the proxy server address and its port number in the provided fields on the right. - If you have a Proxy Auto-Configuration (PAC) file:
a. Select “Automatic Proxy Configuration.”
b. Enter the proxy address into the URL field. - If your proxy server requires a password:
a. Check the box that says “Proxy server requires password.”
b. Enter your account name and password in the Username and Password fields. - Finally, click “OK” to save your proxy server settings.
- You’re now all set to browse the internet using your proxy server
How To Set Up A Proxy In Google Chrome
To adjust proxy settings in Google Chrome, follow these steps:
- Open Chrome and click on the three-dot menu icon to access Settings.
- Scroll down to the bottom of the Settings page and click on “Show advanced settings…”
- In the expanded settings, locate the “System” section and click on “Open your computer’s proxy settings.”
- Now, follow the instructions specific to your operating system (macOS or Windows) for setting up your proxy server settings. You can find these instructions in the earlier sections of this guide.
In summary, configuring a proxy server in Google Chrome involves initial steps within the browser, and then you complete the setup in your computer’s operating system as explained earlier.
How To Set Up A Proxy Server In Safari
To adjust proxy settings in Safari, follow these steps:
- Open Safari and click on “Safari” in the browser toolbar. Then, choose “Preferences.”
- Click on the “Advanced” tab within the Preferences window.
- Under the “Proxies” section, click on “Change settings…”
- Now, you’ll need to refer back to the macOS instructions provided earlier in this guide to set up your proxy server settings. Follow those instructions to complete the configuration.
How To Set Up A Proxy Server In Edge
To modify proxy settings in Microsoft Edge, which is the built-in web browser for Windows 10, and operates similarly to Chrome, follow these steps:
- Open Microsoft Edge, and at the top-right corner, click on the Menu button (represented by three horizontal dots). Then, select “Settings.”
- Scroll down to the “Advanced settings” section and click on the “View advanced settings” icon.
- Click the “Open proxy settings” button.
- Now, refer back to the instructions for Windows 10 provided earlier in this guide, and follow those steps to configure your proxy server settings.
How To Set Up A Proxy Server In Firefox
Unlike some other web browsers, Firefox doesn’t automatically use your system’s proxy settings. If you want to configure a proxy in Firefox, follow these steps:
- Open the Firefox menu and select “Options.”
- Click on the “Advanced” icon.
- Select the “Network” tab.
- In the “Connection Settings” section, choose “Auto-detect proxy configuration for this network.” If prompted, enter the proxy address.
- Alternatively, in the “Connection Settings,” you can select “Use system proxy settings.”
- If you choose this option, Firefox will use the proxy settings configured in your operating system.
- Click “OK” to save your settings.
How To Set Up A Proxy Server In Internet Explorer
While Internet Explorer (IE) is considered an outdated web browser, some people and companies may still use it. If you need to set up a proxy in Internet Explorer, follow these steps:
- Open the IE toolbar and select “Internet Options.”
- Go to the “Connections” tab.
- Click on “LAN Settings.”
- Check the box that says “Use a proxy server for your LAN.”
- When prompted, enter the proxy server name and port number.
- Click “OK” to save your settings.
How To Set Up A Proxy Server In Android
Configuring proxy settings on Android requires adjusting settings for each network individually. Keep in mind that the proxy you set up will apply only to your web browser; other apps may use their own settings. VPNs often offer a more comprehensive solution, as they cover all internet traffic from your device. Here’s how to set up a proxy on Android:
- Open Android’s Settings and tap on “Wi-Fi” to see the list of available Wi-Fi networks.
- Long-press on the name of the Wi-Fi network for which you want to change the proxy settings. Then, tap on “Modify Network.”
- Tap “Advanced Options.”
- To manually configure your proxy settings, tap on “Manual.” Enter the hostname (or IP address) and the proxy port number.
OR
- If you have a Proxy Auto-Config (PAC) file, select “Proxy Auto-Config,” and Android will prompt you to enter the PAC address.
- Tap “SAVE” to save your proxy settings.
How to Set Up a Proxy Server in iOS
To configure a proxy on an iOS device, follow these steps:
- Go to “Settings” and tap on “Wi-Fi.”
- Select the active Wi-Fi connection you are currently using.
- Under “HTTP proxy,” click on “Configure Proxy.”
- Tap “Manual” to manually change your proxy settings. Here, you can enter the host name, proxy port, and, if necessary, your authentication username and password.
OR
- If your service provider supports the Web Proxy Auto-Discovery Protocol (WPAD), tap “Automatic.”
- If required, enter the location of the Proxy Auto-Config (PAC) file.
- After configuring the settings, tap back to return to the Wi-Fi selection window.
How to Use Proxy Server?
Once you have configured a proxy server, using it is pretty straightforward:
Just open your browser and surf the web as you normally would. The proxy will automatically handle the requests, redirecting your data through its server.
If you wish to confirm that your proxy is working, you can visit a website like “WhatIsMyIP” to see your IP address. It should display the IP of the proxy server and not your actual IP.
While a proxy provides a level of anonymity, always ensure you’re using secure and encrypted connections (like HTTPS) when dealing with sensitive data or transactions. Not all proxies provide the same level of security and privacy. Some might even log your activities. Hence, always choose a reputable proxy service.
Remember, while a proxy server can mask your IP, it may not encrypt your data. For complete privacy and encryption, consider using a Virtual Private Network (VPN).
When Should We Use A Proxy Server?
A proxy server acts as a gateway between your device and the internet, offering a range of benefits related to security, privacy, and functionality. Here’s a breakdown of when using a proxy server might be particularly advantageous:
Blocked Internet Protocol (IP):
When you need to bypass geo-restrictions or access content that’s limited to certain regions. A proxy can mask your real IP address, making it appear as though you’re accessing the web from a different location.
Stopping Cookies:
To maintain privacy and prevent websites from tracking your online behavior. A proxy can restrict sites from placing cookies on your device.
Navigating the Firewall:
Useful in situations where your network (like a school or office) has strict firewall settings. A proxy can help you access blocked websites or services.
Compress Traffic:
When you want to save on bandwidth or accelerate web page loading times. Some proxy servers reduce the size of data packets, making internet usage faster and more efficient.
Cache Website:
For quicker access to frequently visited web pages. Proxy servers can store cached versions of websites, reducing the need to fetch the entire page from the source every time.
Remove Ads:
If you want a cleaner browsing experience. Some proxies can filter out advertisements, giving you an ad-free web experience.
Stop Malware:
To enhance security. Some proxy servers are equipped with features that detect and block malicious websites or downloads, protecting your device.
Remove Tailoring:
When you don’t want personalized content. Websites often tailor content based on your browsing habits. A proxy can help you get a more generic view by preventing these sites from accessing your browsing history.
Access the Deep Web:
For those times you want to explore parts of the web that aren’t indexed by traditional search engines. While proxies can help, for deeper security and anonymity, consider using tools like Tor.
Buy Internationally:
When shopping online and wanting to access region-specific deals or products. A proxy can mask your location, potentially helping you access region-exclusive offers.
Access Entertainment:
For times when you want to stream shows, movies, or music that might be blocked in your region. Proxies can help bypass these restrictions.
Conclusion
In summary, learning how to set up a proxy server is not just a tech-savvy move; it’s a smart way to take control of your online privacy and security. We’ve broken down the process into easy-to-follow steps, making it attainable for anyone to enhance their internet experience. You don’t have to be a tech guru to get this done; you just need the right guide, and you’ve found it here.
If you found this information valuable, don’t hesitate to dive into more insightful blogs from Twistory to continue empowering your digital life. Happy browsing!
