
For those who are newly initiated into the Apple ecosystem, especially those transitioning from a Windows background where the ‘Prt Scrn’ (Print Screen) function is second nature, the process of taking screenshots on Mac may not seem as straightforward.
Capturing a screen image on a Mac is a matter of a few simple keystrokes, yet it’s acknowledged that the process has not always been perceived as intuitive. Diverse commands exist for different types of screenshots, such as capturing entire windows or selected portions, and historically, video capture was predominantly a function of QuickTime Player.
This guide aims to explain the process of taking screenshots and recording video on a Mac, and introduces several efficient tools designed to streamline and simplify the screenshot process for Apple users.
Mac screenshot shortcut
Every Mac computer is equipped with the ability to take high-quality screenshots, which you can then edit or share according to your requirements. The features extends to full-screen captures, individual windows, or specific screen segments. The combination of Shift, Command, and number keys is essential to the various screenshot commands on a Mac.
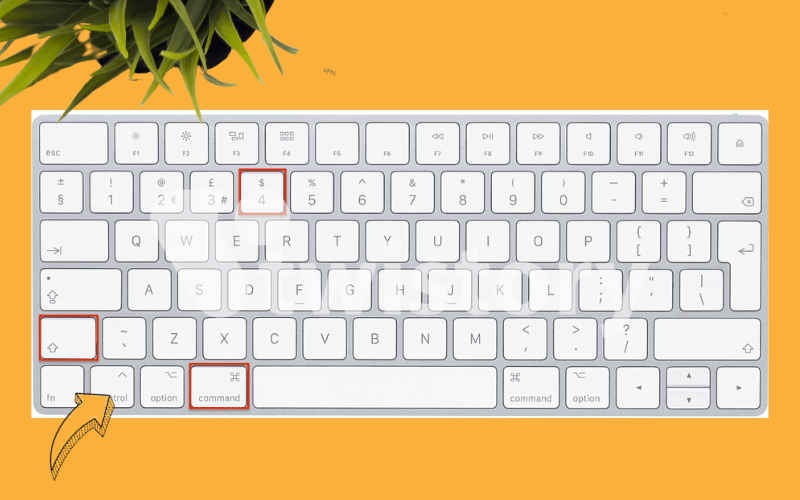
- To capture the entire screen of your Mac, at the same time press Shift + Command + 3.
- For partial screen captures, press Shift + Command + 4. This command transforms the cursor into a crosshair, allowing you to select the desired area by clicking and dragging the cursor, and then capturing it by releasing the mouse button.
- To take a screenshot of particular windows, press with Shift + Command + 4, then tap the Space bar. This will convert the crosshair into a camera icon, which you can move over various windows. Click to capture the window that the icon highlights.
However, it’s important to note that Apple’s default screenshot tool offers a limited number of capture modes. Further in this article, Twistory explore the expansive options available through third-party applications, helping you to find the most suitable tools for your screenshot needs.
The best screenshot app for your Mac
Here’s a curated selection of top-tier screenshot applications available for Mac users:
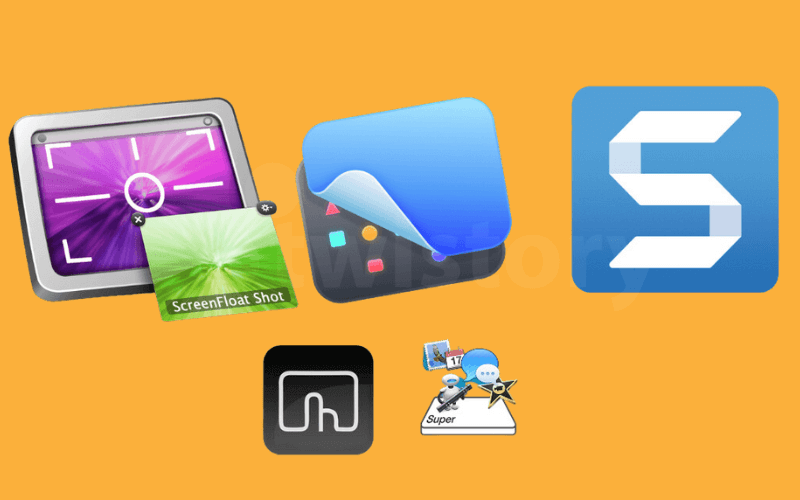
Snagit
A robust screenshot application, Snagit offers an comprehensive feature set that cater to comprehensive screen capture needs, including full screens, specific areas, or singular windows. It comes equipped with a wide annotation tools, enabling users to enhance their screenshots with text, arrows, and shapes for clarity.
CleanShot X
Recognized for its intuitive interface, CleanShot X is popular among users for its advanced annotation capabilities. The application distinguishes itself with unique features, such as capturing scrolling content and incorporating watermarks to protect your screenshots.
Skitch
For those seeking simplicity and functionality, Skitch provides an uncomplicated solution for swift screenshot capture and basic annotation tasks. It is an ideal alternative for users who find the comprehensive feature sets of Snagit or CleanShot X more than they require.
Nimbus Capture
A affordable option, Nimbus Capture offers a free solution without skimping on features. Users can capture entire screens, designated regions, or specific windows, and it includes a annotation tools as well as an integrated screen recording function.
Monosnap
Favored for its fast capture and straightforward operation, Monosnap is tailored for users who prioritize speed and simplicity in a screenshot tool.
The optimal screenshot application for you hinges on your specific needs and usage preferences. For a feature-rich and flexible tool, Snagit or CleanShot X stands out as prime choices. If simplicity and ease of use are your priorities, Skitch or Monosnap would suit you well. For those seeking a no-cost alternative with a robust feature set, Nimbus Capture offers a commendable solution.
Screenshot on Mac with screenshot menu
Beginning with macOS Mojave, users have access to a dedicated screenshot menu for capturing screens in different ways, alongside the traditional keyboard shortcuts for specific actions like capturing a window or a selected area. Earlier macOS versions do not have this screenshot menu, though they retain the key commands for capturing screen sections or the entire screen.
For those utilizing macOS Mojave and subsequent versions, including Catalina, Big Sur, or Monterey, the Command + Shift + 5 shortcut summons a screen capture interface. The following options are available to the user:
- Capture the Entire Screen
- Capture Selected Window(s)
- Capture Selected Portion
- Record Entire Screen
- Record Selected Portion
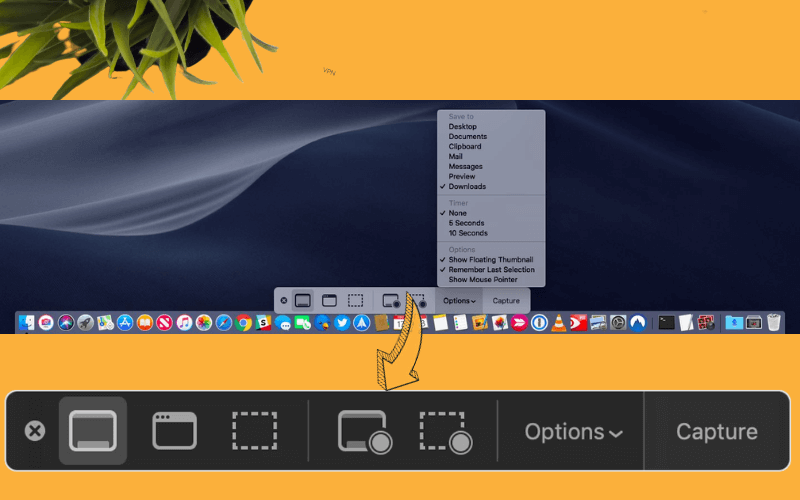
Additionally, within this interface, an Options button is available on the right side, providing further control, such as designating a save location for screenshots and video captures. Consequently, for users seeking a simple solution to the question, “How do I take a screenshot on my Mac?” upgrading to Mojave or later could greatly simplify the process.
Screen prints the selected area
Referring back to our earlier discussion on shortcuts, let’s delve into the specifics of capturing a screenshot of a designated area on your screen:
- Press and hold the Shift, Command, and 4 keys simultaneously.
- Utilize the crosshair that appears to mark the area of the screen you wish to capture. If you need to adjust the selected area while dragging, hold down the Space bar as you move the selection. To cancel the screenshot process, press the Esc (Escape) key.
- To take the screenshot, release the mouse or trackpad button.
Should a thumbnail of the screenshot emerge in the corner of your screen, click on it to edit the screenshot immediately. If not, the screenshot will automatically be saved to your desktop.
Take a screenshot of the entire screen
To take a screenshot capturing the entire your Mac’s screen, execute the following steps:
- Press and hold the Shift, Command, and 3 keys at the same time.
- If a thumbnail of the screenshot appears in the corner of your screen, click on it to make immediate edits. Alternatively, you can simply wait for the screenshot to be automatically saved to your desktop.
How to screenshot a specific section or window on Mac
To take a screenshot of a particular window or menu on your Mac, follow these steps:
- First, find and open the window or menu you wish to capture.
- Next, press and hold Shift, Command, 4, and the Space bar together. The cursor will transform into a camera icon, to indicate that you can click to capture the window. If you decide not to proceed with the screenshot, press the Esc (Escape) key to cancel.
How to take a screenshot using the Touch Bar
If you’re missing the simple functionality of the Print Screen button from Windows, and your Mac is equipped with a Touch Bar, you’re in luck. You can customize the Touch Bar to include a screenshot button. Here are the steps:
- Access System Preferences by clicking on the Apple menu, then select ‘Keyboard’.
- Click on ‘Customize Control Strip’ to modify the Touch Bar.
- Drag the screenshot button to your preferred location on the Touch Bar and then save your changes.
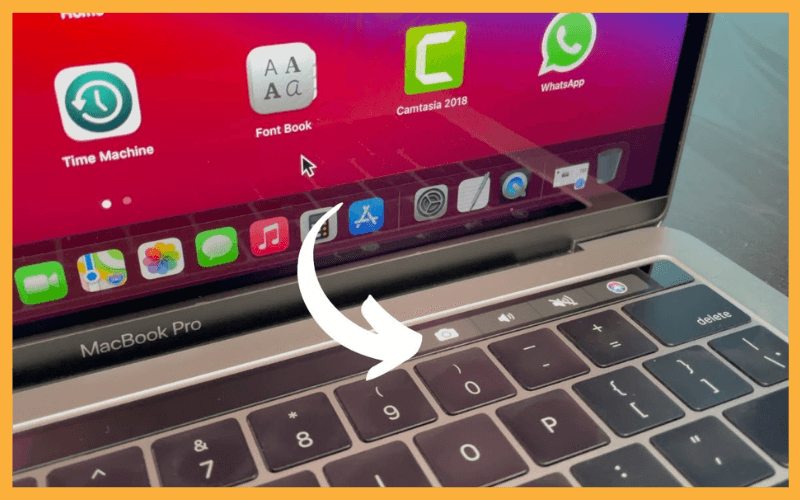
With this setup, capturing screenshots on a Mac becomes a breeze using the Touch Bar. Simply tap the screenshot button to activate the screen capture menu. If you need to adjust the default save location for screenshots, select “Save To”. You can then choose to capture the full screen, a selected area, or a specific window – just position the cursor accordingly and take your screenshot.
How to print screen on Mac using Preview
Preview, Apple’s built-in image and PDF viewer, is likely a essential part of your daily workflow. It also features a screenshot tool that enables capturing specific screen parts, individual windows, or the entire screen. A significant advantage of using Preview for screenshots is that it automatically opens the captured image in a new Preview window, providing immediate access to editing tools. This allows for resizing, adding annotations, and more.
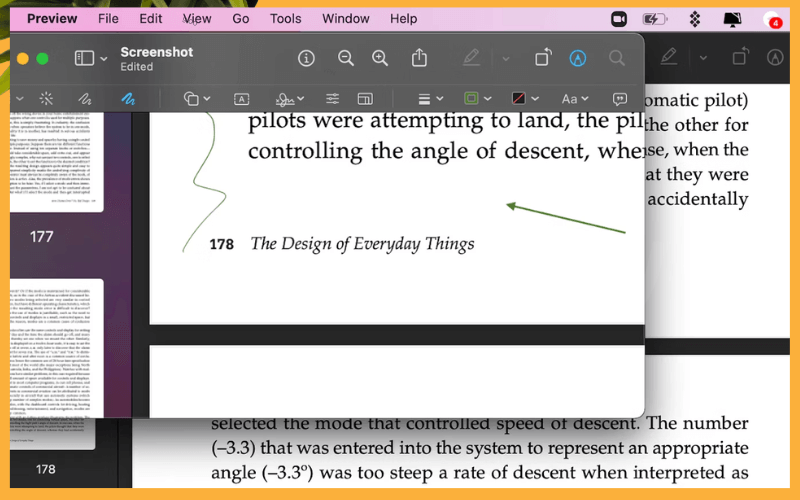
Capturing a screenshot using Preview is simple. Follow these steps:
- In Preview, navigate to the app menu.
- Select “File” and then “Take Screenshot”.
- Choose the desired capture mode: either a portion of the screen, a specific window, or the entire screen.
- After capturing, the screenshot will open in a new window within Preview, ready to be edited. You can then save your edited screenshot to any location on your Mac.
Organize MacOS screenshots
Maintaining an organized collection of screenshots on macOS is key to a uncluttered desktop and to ensure you can locate the images you need with ease. Here’s a structured approach to manage your screenshots on macOS:

Establish a Specific Folder for Screenshots
By default, macOS saves screenshots to the desktop, which can lead to disarray, particularly with frequent captures. To avoid this by creating a specialized folder for your screenshots—preferably within your Documents folder or iCloud Drive for quick retrieval.
Modify the Default Save Destination for Screenshots
Organizing screenshots on macOS is important for keeping your desktop clutter-free and easily finding the screenshots you need. Here are some tips for organizing screenshots on macOS:
Create a specific screenshot folder
By default, screenshots on macOS are saved to your desktop. This can quickly become cluttered, especially if you take a lot of screenshots. To to avoid this, create a dedicated folder for storing your screenshots. You can create this folder anywhere on your computer, but it’s usually a good idea to place it in your Documents folder or iCloud Drive for easy access.
Change the default screenshot save location
After you’ve created a dedicated screenshot folder, you can change the default save location for screenshots to this folder. To do this, follow these steps:
- To open the Screenshot tool, press Command + Shift + 5 to open the Screenshot tool.
- To access the Options button, click the Options button.
- To change the default save location, click Other Location, click Other Location.
- To navigate to the folder you created for storing screenshots, click the folder you created for storing screenshots and select it.
- To close the Options window, click the Options window.
Use the Screenshot tool’s organization options
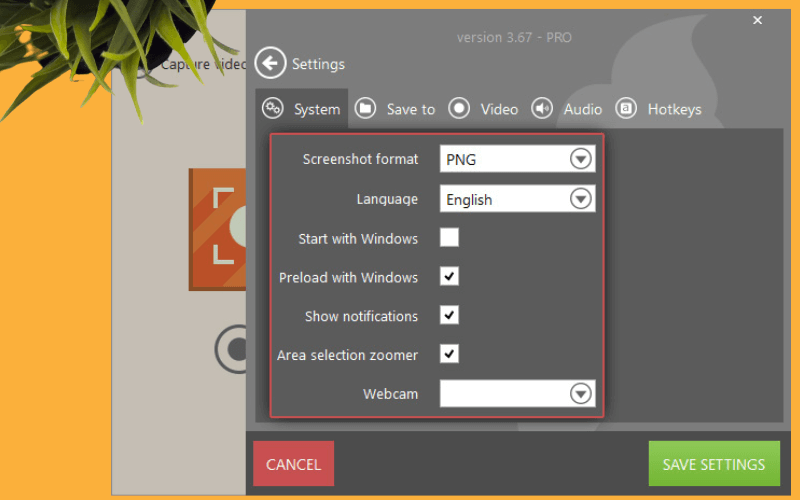
The Screenshot tool offers a few options for organizing your screenshots. You can choose to save screenshots with a prefix or suffix, and you can also choose to save them in a specific format (PNG, JPEG, or HEIC). To access these options, follow these steps:
- Press Command + Shift + 5 to open the Screenshot tool.
- Click the Options button.
- Under Options, you can choose to save screenshots with a prefix or suffix, and you can also choose to save them in a specific format.
- Close the Options window.
Use a third-party screenshot tool
If you need more advanced organization features, you can use a third-party screenshot tool. There are many different screenshot tools available, but some popular options include Snagit, CleanShot X, and Lightshot. These tools offer features such as automatic renaming, tagging, and search.
Use tags to organize your screenshots
Tags can be a great way to organize your screenshots, especially if you take a lot of screenshots for different projects or purposes. You can add tags to screenshots using the Finder or a third-party screenshot tool.
Delete old or unnecessary screenshots
Regularly review and delete old or unnecessary screenshots to keep your screenshot folder organized and free up disk space.
Apple’s way of sharing screenshots
Apple provides various methods for sharing screenshots across its devices, including iPhones, iPads, and Macs. Here’s a comprehensive overview of Apple’s screenshot sharing options on Mac:
Sharing via Mail
- Take the screenshot using the preferred method (Command + Shift + 4 or Command + Shift + 5).
- The screenshot will appear as a thumbnail in the lower-left corner of the screen.
- Click the thumbnail and select Mail.
- Compose an email, attach the screenshot, and click Send.
Sharing via Messages
- Take the screenshot using the preferred method.
- Open the Messages app and start or open an existing conversation.
- Drag the screenshot thumbnail from the lower-left corner of the screen into the conversation window.
- Release the mouse button to send the screenshot.
Sharing via AirDrop
- Make sure AirDrop is enabled on the Mac and the recipient’s device.
- Take the screenshot using the preferred method.
- The screenshot thumbnail will appear in the lower-left corner of the screen.
- Click the thumbnail and select the recipient’s name from the AirDrop menu.
- The screenshot will be sent to the recipient’s device.
Sharing via Save to Disk
- Take the screenshot using the preferred method.
- The screenshot thumbnail will appear in the lower-left corner of the screen.
- Click the thumbnail and select Save to Disk.
- Choose the desired location and click Save.
- You can then share the file from the saved location.
Third-party Solution: Dropshare
Dropshare is a cloud-based file sharing service that streamlines the process of sharin screenshots. It offers several advantages over Apple’s built-in methods:
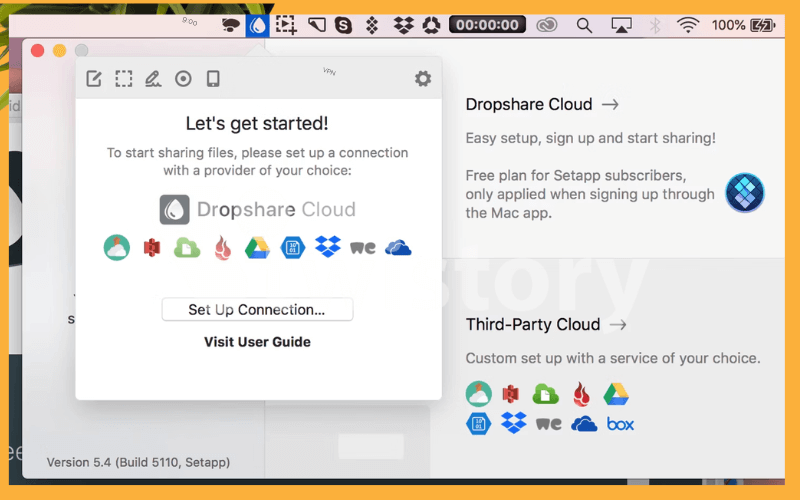
Simplicity:
- Drag and drop screenshots directly into the Dropshare app or the Dropshare website.
- No need to create emails or upload files manually.
Convenience:
- Share screenshots instantly with anyone, regardless of their device or platform.
- Access shared screenshots from anywhere with an internet connection.
Flexibility:
- Integrate Dropshare with your preferred cloud storage services, such as Google Drive, Dropbox, or iCloud.
- Utilize Dropshare’s proprietary cloud storage if you prefer to keep your screenshots separate.
If you frequently share screenshots, Dropshare offers a more efficient and user-friendly alternative to Apple’s built-in methods. Its simplicity, convenience, and flexibility make it a valuable tool for sharing screenshots with colleagues, friends, or family.
Conclusion
Mastering the art of taking screenshots on a Mac is easier than ever with macOS’s intuitive tools and features. For those moving from Windows, Apple’s dedication to a seamless transition is evident, promising further enhancements down the line. While native options are quite comprehensive, exploring third-party snipping applications can unlock even more functionalities. Keep up with these advancements and discover more insightful tips by following Twistory.net, where valuable knowledge and tech expertise are just a click away.
FAQ
How do I view screenshots on Mac?
On a Mac, when you snap a screenshot, it’s immediately saved to the Desktop. To find and view these screenshots, you can either navigate to your Desktop or use the Finder to locate the Desktop folder, where your screenshots are waiting for you. For those with numerous screenshots, Finder offers a more streamlined experience, presenting them along with the date and time they were captured, which can greatly simplify the search process.
How do I paste screenshots on Mac?
On a Mac, you can copy a screenshot to the clipboard instead of saving it, which is particularly useful if you need to use the screenshot immediately and don’t intend to store it. To do this, hold down the Control key as you take the screenshot. This will send the screenshot to your clipboard, without saving it to the desktop or a folder. When you’re ready to use it, just navigate to the document or field you want to insert the screenshot into and press Command + V to paste it there.
How do I turn off screenshots on Mac?
To turn off screenshot functionality on a Mac, navigate to System Preferences, then Security & Privacy, and go to the Privacy tab. Within that section, find Screen Recording. You’ll need to unlock the padlock by entering your password to make changes. This section will display a list of applications with screen recording permissions. From here, you can manage which apps are allowed to capture your screen by checking or unchecking them accordingly.
